计算机网络 lab1
Lab 1: Set Up Environment and Test Basic Softwares
准备工作:
(1) 安装 Virtualbox
(2) 在 Virtualbox 中建立安装 ubuntu 作业系统的虚拟机
在 Windows 下安裝 VirtualBox 及 Ubuntu 18.04:
(Ubuntu18.04 可以在官网下载,或是下载阿里镜像)
https://hth322.pixnet.net/blog/post/183391361-% E5% AE%89% E8% A3%9Dubuntu% E5%9C% A8oracle-vm-virtualbox% E7% B4% AE% E8% A8%98
https://murphymind.blogspot.com/2020/01/windows-virtualbox-ubuntu-1804.html
(3) 设置虚拟机网卡(net + hostonly)

(4) 在 linux 上安装 wireshark
1 | $ dpkg -l |grep wrieshark// 查看系统是否有这个包 |
若出现 “Should non-superusers be able to capture packages?” ,选择 yes
若没有,则手动设置 1
$ dpkg-reconfigure wireshark-
把当前用户加入到 wireshark 组当中:1
$ sudo adduser $USER wireshark
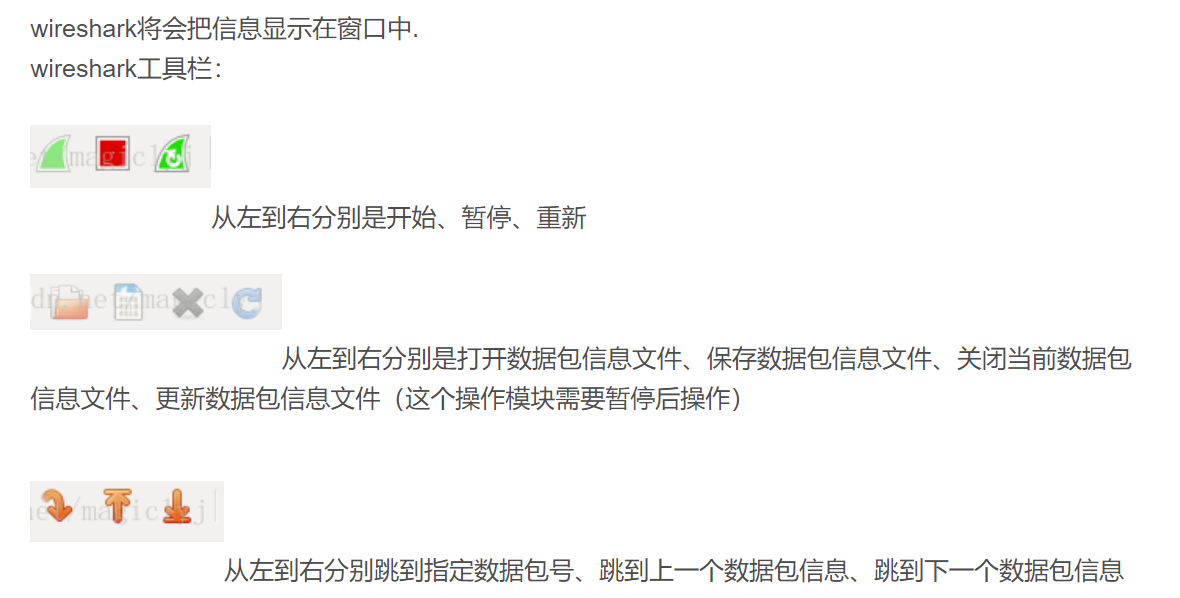
(5) 运行 wireshark,选择要检测的端口
1. What protocol does “ping” and “traceroute” use? (10 points)
打开 wireshark 开始监测1
2$ ping google.com// 可以看到使用的协议是 ICMP
$ traceroute google.com// 可以看到使用的协议是 UDP
2. What is the IP address of www.sjtu.edu.cn? (10 points)
1 | $ ping www.sjtu.edu.cn// 可以看到 IP |
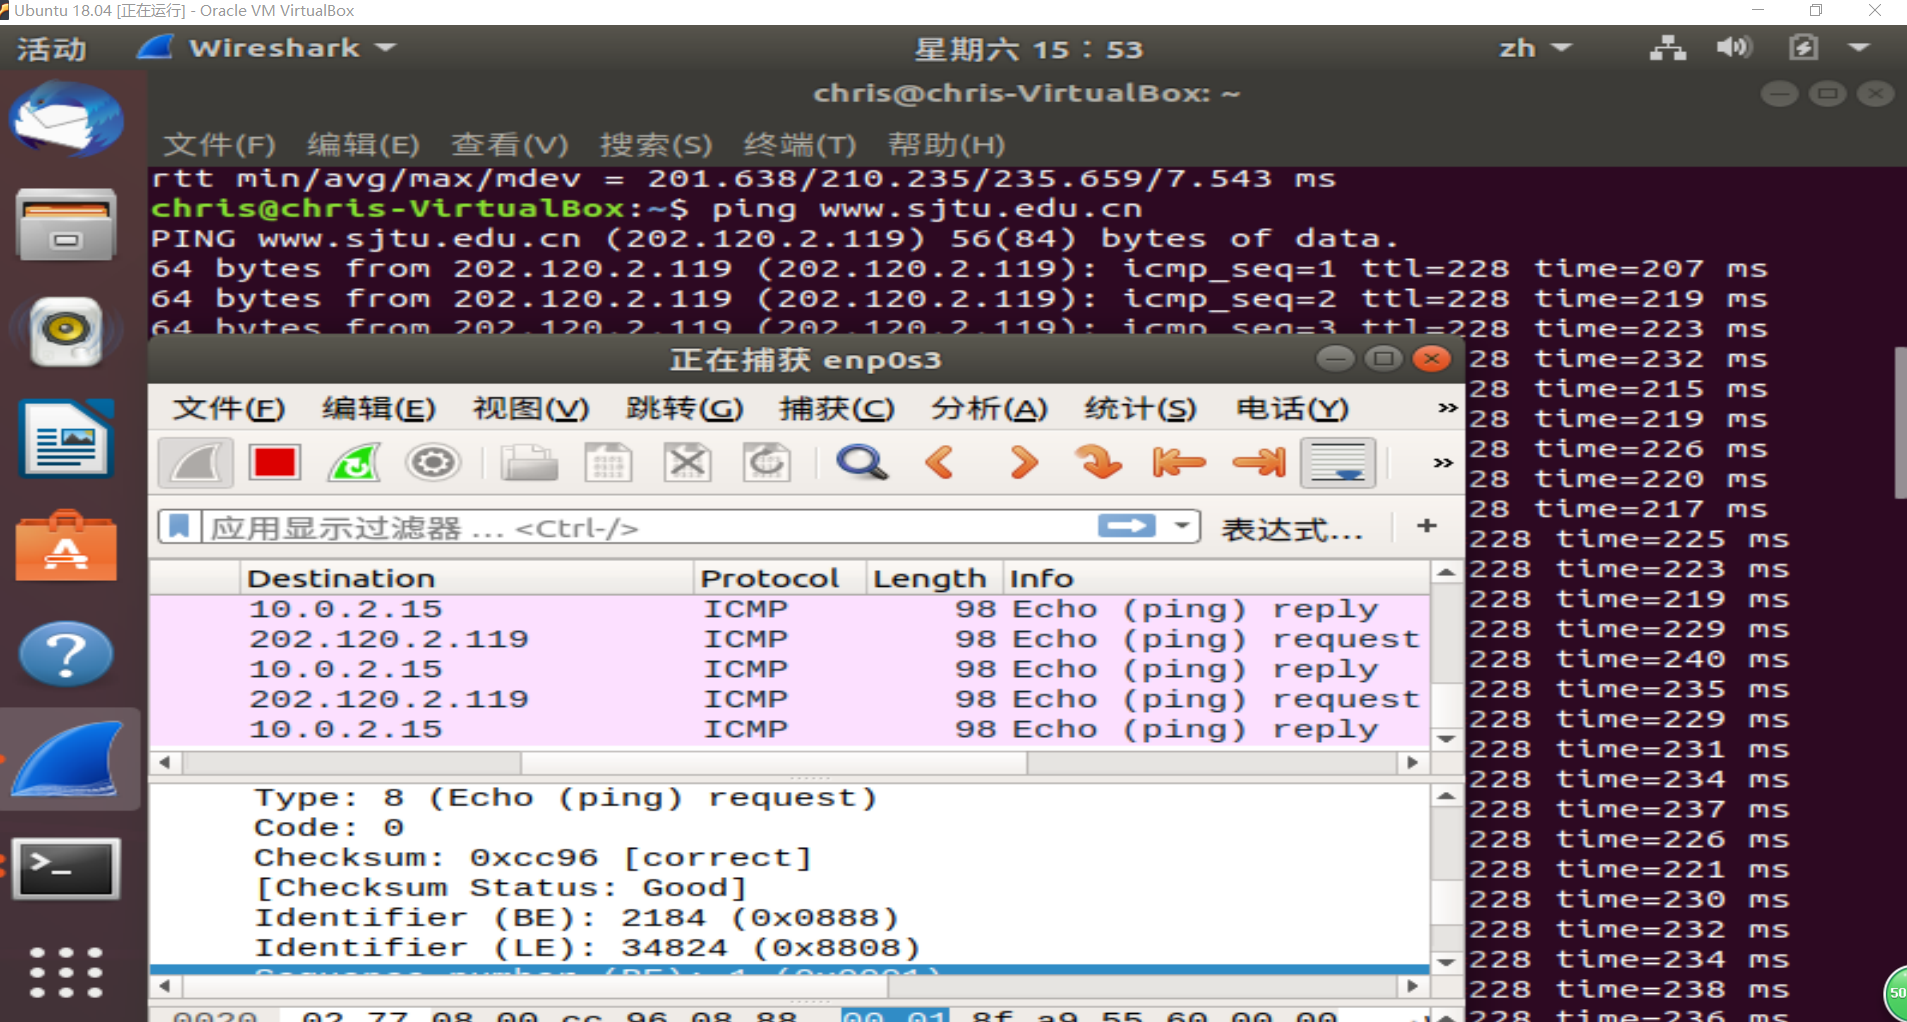
3. What is the average round trip time (RTT) from your VM to www.sjtu.edu.cn and mit.edu.
Analyze the reason for the difference of their RTTs. (25 points)
(1) ping to send 10 packets and get the average RTT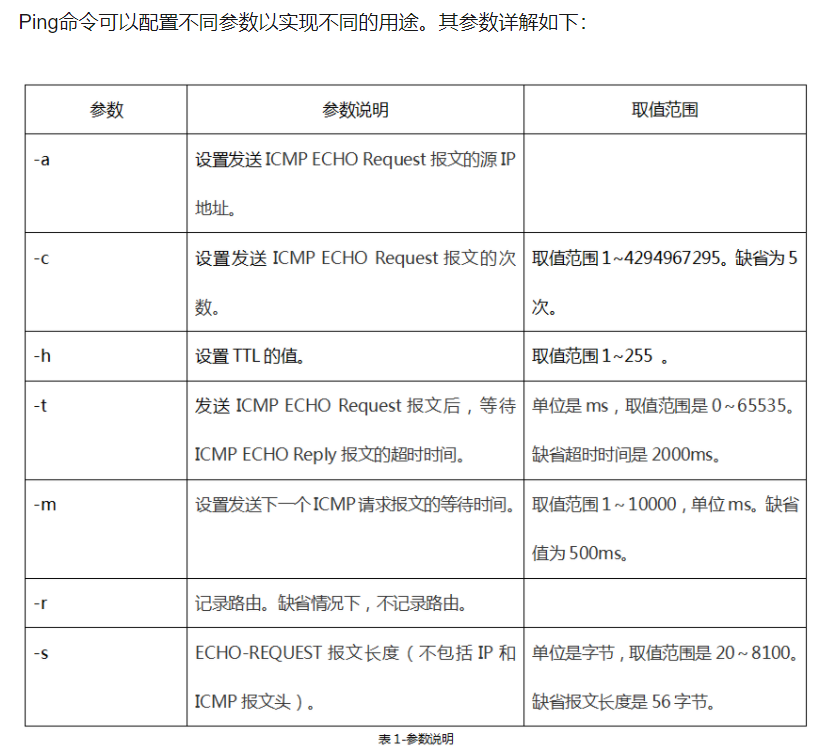
1
$ ping www.sjtu.edu.cn -c 10 // 可以看到 rtt
4. What is the TCP bandwidth between your two VMs? (25 points)
(1) 安裝 iPerf31
$ sudo apt-get install iperf3
(2) 测试网络频宽
Server 端:1
$ iperf3 -s
Client 端1
$ iperf3 -c SERVER_IP
(3) connection timeout 问题解决
https://www.mdeditor.tw/pl/2NjU/zh-tw
如何诊断:1
2
3// 檢查 ipv4 forwarding 是否開啟
$ sysctl net.ipv4.ip_forward
//net.ipv4.ip_forward = 0,意味著未開啟
如何修復:1
2
3
4
5
6//this will turn things back on a live server
$ sysctl -w net.ipv4.ip_forward=1
//on Centos this will make the setting apply after reboot
$ echo net.ipv4.ip_forward=1 >> /etc/sysconf.d/10-ipv4-forwarding-on.conf
// 驗證並生效
$ sysctl -p
如何診斷:1
2
3// 檢查 bridge netfilter 是否開啟
$ sysctl net.bridge.bridge-nf-call-iptables
net.bridge.bridge-nf-call-iptables = 0,表示未開啟
如何修復:1
2
3
4
5
6
7Note some distributions may have this compiled with kernel,
check with cat /lib/modules/$ (uname -r)/modules.builtin | grep netfilter
$ modprobe br_netfilter
開啟這個 iptables 設定
$ sysctl -w net.bridge.bridge-nf-call-iptables=1
$ echo net.bridge.bridge-nf-call-iptables=1 >> /etc/sysconf.d/10-bridge-nf-call-iptables.conf
$ sysctl -p
https://gist.github.com/iamcryptoki/ed6925ce95f047673e7709f23e0b9939
Fix sysctl: cannot stat /proc/sys/net/bridge/bridge-nf-call-iptables.1
2
3
4
5
6
7
8
9$ modprobe bridge
$ echo "net.bridge.bridge-nf-call-iptables = 1" >> /etc/sysctl.conf
$ sysctl -p /etc/sysctl.conf
sysctl: cannot stat /proc/sys/net/bridge/bridge-nf-call-iptables: No such file or directory sysctl: cannot stat /proc/sys/net/bridge/bridge-nf-call-ip6tables: No such file or directory
// SOLUTION
$ modprobe br_netfilter
$ sysctl -p /etc/sysctl.conf
5. Select a VM as your host machine, and another VM as your server machine, then use ssh on your host to connect to the server. (15 points)
(1) 在 UBuntu 安装 ssh
(a) 开启 terminal
(b) 更新套件清单1
$ sudo apt-get update
(c) 安装 OpenSSH Server1
$ sudo apt-get install -y openssh-server
(d) 确认 SSH 服务1
$ sudo service ssh status
(e) 查询 Ubuntu 的 IP1
$ ifconfig //server 的 IP
(f) 在 host mechine 上,ssh 到 server1
ssh chris@192.158.xx.xxx
6. Use scp to copy a file from your host to the server. (15 points)
(1) 本地端 Host 需安装 openssh-client 套件
1 | $ sudo apt-get install openssh-client |
(2) 远端 Server 需安装 openssh-server 套件
1 | $ sudo apt-get install openssh-server |
(3) 将文件从本机 Host 复制到远端主机 Server
1 | $ sudo chmod 777 /home/test// 改变权限 |
问题解决
E: 无法获取 dpkg 前端锁 (/var/lib/dpkg/lock-frontend),是否有其他进程正占用它?
(1) 杀死进程1
2$ ps -e|grep apt-get
sudo kill [进程]
(2) 重新启动
知识补充
1. 本地接口列表包含一个 Random packet generator,这是什么
这是 wireshark 提供的一个模拟;每次随机生成某种协议的 1000 个包;供研究学习使用。
透过 wireshark 查看封包,可以了解到為什麼端到端加密很重要。
假設你正在登入一個不使用 HTTPS 的網站。與你在同一網路上的任何人都可以嗅探封包,並在原始資料中看到使用者名稱和密碼。
這就是為什麼現在大多數聊天應用程式使用端到端加密,而大多數網站使用 https (而不是 http)
2. Traceroute 工作原理
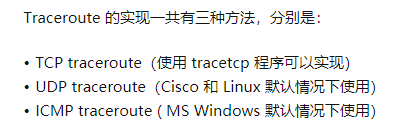
Traceroute 最简单的基本用法是:traceroute hostname
Traceroute 程序的设计是利用 ICMP 及 IP header 的 TTL (Time To Live) 栏位 (field)。首先,traceroute 送出一个 TTL 是 1 的 IP datagram(其实,每次送出的为 3 个 40 字节的包括源地址,目的地址和包发出的时间标签)到目的地,当路径上的第一个路由器 (router) 收到这个 datagram 时,它将 TTL 减 1。此时,TTL 变为 0 了,所以路由器会将此 datagram 丢掉,并送回一个「ICMP time exceeded」消息(包括发 IP 包的源地址,IP 包的所有内容及路由器的 IP 地址),traceroute 收到这个消息后,便知道这个路由器存在于这个路径上,接着 traceroute 再送出另一个 TTL 是 2 的 datagram,发现第 2 个路由器…… traceroute 每次将送出的 datagram 的 TTL 加 1 来发现另一个路由器,这个重复的动作一直持续到某个 datagram 目的地。当 datagram 到达目的地后,该主机并不会送回 ICMP time exceed 消息,因为它已经是目的地了,那么 traceroute 如何得知目的地到达了呢?
Traceroute 在送出 UDP datagrams 到目的地时,它所选择送达的 port number 是一个一般应用程序都不会用的号码(30000 以上),所以当此 UDP datagram 到达目的地后该主机会送回一个「ICMP port unreachable」的消息,而当 traceroute 收到这个消息时,便知道目的地已经到达了。所以 traceroute 在 Server 也是没有所谓的 Daemon 程式。
Traceroute 提取发 ICMP TTL 到期消息设备的 IP 地址并作域名解析。每次,Traceroute 都打印出一系列数据,包括所经过的路由设备的域名及 IP 地址,三个包每次来回所花时间。其中 CDN (内容分发网络) 就是为了降低与用户路由的个数而设计的。
3. Ping 工作原理
運作原理:向目標主機傳出一個要求封包,並等待接收回應封包。程式會按時間和成功回應的次數估算封包遺失率(丟包率)和封包來回的時間(即 RTT)
操作补充
1. 查看主机 ip 地址方式:
1 | $ ifconfig |
2.Linux 从一般用户切换到 root 用户
1 | $ sudo su |
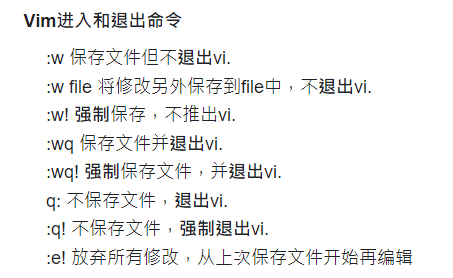
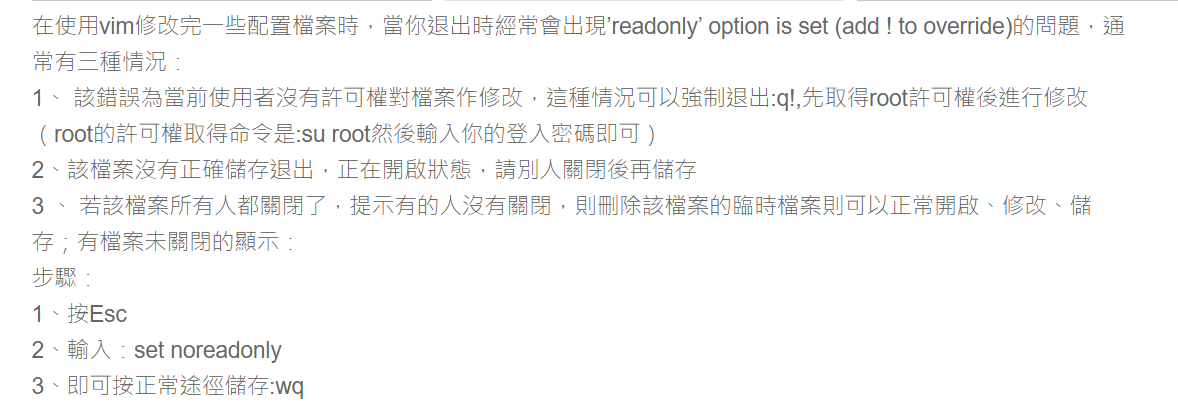
3.vim 常用指令
详细名词解释
https://sls.weco.net/node/28883
讨论:安装 VirtualBox, VMWare, or Parallels 哪个比较好?
计算机网络系列
计算机网络 lab1
计算机网络 lab2 使用 Mininet 创建网络拓扑
计算机网络 lab3 使用 Socket 完成多人聊天室 — 原理
计算机网络 lab3 使用 Socket 完成多人聊天室 — 实作
计算机网络 lab4 Overlay Network 和 VXLAN